1. Introduction
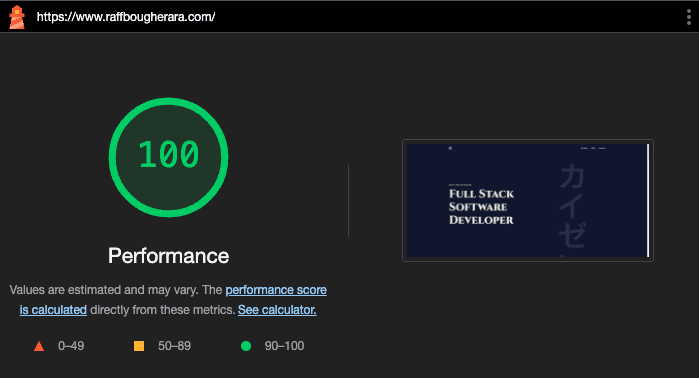
When I set out to build the new version of my personal portfolio website, my primary goals were clear: I wanted the site to be lightweight, efficient, and superfast. As a software engineer, it's essential that my portfolio not only showcases my projects but also reflects the quality and performance standards I strive for in my work.
Since the content on my portfolio doesn't change frequently, I realized I could optimize the site by pre-rendering the content ahead of time. This approach ensures that the website loads quickly and efficiently for users. However, to choose the best way to build the site, I needed to revisit some web development concepts that influence how web pages are rendered and delivered to users.
In this project, I'll walk through the strategies I considered and how they shaped the decisions behind building a fast and reliable portfolio website.
2. Understanding some Web Rendering Technqiues: SSR, CSR, SSG and ISR
Before diving into the technical choices I made, it's essential to understand the four main rendering strategies available in web development: SSR, CSR, SSG and ISR.
2.1 Server-Side Rendering (SSR)
SSR is when the server generates the HTML for each page on demand, whenever a user requests a page. The server processes all the necessary data and returns a fully-rendered HTML page to the client. After that, the browser downloads and executes the JavaScript to make the page interactive. SSR is useful for dynamic websites but can introduce a delay as the server needs to generate the HTML on every request.
2.2 Client-Side Rendering (CSR)
CSR is where the server sends a minimal HTML shell to the client, and the JavaScript in the browser generates the actual content dynamically. The page becomes visible and interactive only after the JavaScript has been fully loaded and executed. While CSR is useful for highly interactive single-page applications, it can lead to slower initial load times because users have to wait for the JavaScript to render the content.
2.3 Static Site Generation (SSG)
SSG is a middle ground. With SSG, the HTML for all pages is generated at build time and then served as static files. This results in fast page loads because the HTML is already pre-built, and no server-side rendering is required. For websites where content doesn’t change often, SSG is the ideal choice as it provides both speed and efficiency.
2.4 Incremental Static Regeneration (ISR)
ISR still pre-renders all pages at build time just like SSG, it allows us to incrementally update static content without rebuilding the entire site. This is especially useful for large sites with hundreds or thousands of pages, where re-building every page on every deployment might be slow and impractical.
3. What I Chose for My Portfolio?
Since my portfolio website's content is relatively static (it doesn’t change frequently), I realized that Static Site Generation (SSG) would be the best approach. By pre-generating the HTML at build time, I could serve my blog posts and project pages instantly when users visit them, without the overhead of SSR or the delayed interactivity of CSR.
With SSG, you get blazing fast load times, improved SEO, and better scalability, security and cost effective. As the pages are served as static files that can be easily cached across a CDN (Content Delivery Network).
4. So, How I Built The Portfolio with SSG?
In my first iteration (which I consider an overkill though). I designed the portfolio with flexibility in mind. I used next-mdx-remote
to fetch content from a separate GitHub repository that hosts my mdx content files, which allowed me to separate content from the codebase and provided the potential to integrate with other external content sources in the future, such as a CMS. This structure was intended to allow for future scalability if the content management needs grew and a Github Repo was no longer an option.
Note: You can skip to The Second Iteration where we leverage a package called Contentlayer to simplify the codebase.
4.1 The First Iteration
To do this efficiently, I designed a flexible structure that allowed for reusable, scalable fetching mechanisms. This involved creating a BaseGithubRepository
abstract class that handled common fetching logic and allowed me to create more specific repositories, like GithubBlogRepository
, for fetching blog posts. While this worked well, it required a more complex setup.
4.1.1 BlogPost Entity
The blog posts were defined as a structured domain entity:
4.1.2 Fetching Content from GitHub
To keep my content organized, I stored blog posts in a separate GitHub repository. I used next-mdx-remote
package to fetch and render the MDX files at build time using generateStaticParams.
Note: As of Next.js +13v getStaticPaths & getStaticProps were deprecated, and replaced by the new generateStaticParams.
I defined a GithubBlogRepository.ts
that extends a BaseGithubRepository
abstract class and implements a IBlogRepository
interface.
Interface
The abstract class
Note: An abstract class allows me to have some default implementations (like fetching content), but still forces subclasses to provide specific behavior for mapping and entity creation.
The Implementation of the abstract class
and then in app/blog/[slug]/page.tsx
where we render our blog post's content
Note: To tell NextJS to use SSG, we simply use
generateStaticParams
.
As the portfolio matured, I shifted focus to efficiency and simplicity. Since my content was relatively static, I realized that I didn’t need the additional overhead of fetching from an external repository for now.
4.2 The Second Iteration
I switched to Contentlayer to manage my markdown (.mdx
) content and dynamically generate pages at build time. By using SSG, I’ve ensured that my website is superfast, even for pages that are dynamically routed (like blog posts and project pages).
4.3.1 Why Contentlayer?
- Automation: Contentlayer automates the fetching, parsing, and transformation of content, so I no longer had to manually manage repositories or deal with the GitHub API. This fit perfectly with my goal of simplifying the setup.
- Type Safety: One of the big wins with Contentlayer was the built-in TypeScript support. It automatically generates types for my content, ensuring that everything stays consistent and type-safe.
- Minimal Effort for Maximum Flexibility: Contentlayer handles a lot of the complexity behind the scenes, allowing me to focus on building, rather than managing data.
4.3.2 How Contentlayer Improved My Workflow
Instead of manually writing repositories to fetch content from GitHub, I moved my blog and project content directly into my project’s src/content
folder locally and let Contentlayer handle the rest.
Here’s how simple my Contentlayer configuration became instead of the previous repositories in The First Iteration
4.3.3 Streamlining the Setup with Contentlayer
Here's how I implemented SSG for my blog posts in the App Router. First, I used the generateStaticParams
function to define which blog post paths should be pre-rendered at build time:
In the above code:
generateStaticParams
: This function tells Next.js to pre-generate the paths for all blog posts by returning theslug
of each post.- BlogPost Component: This component receives the blog post content as props and renders the blog post statically. If no post is found for a given
slug
, a404
page is returned.
4.3.4 What I Gained by Switching to Contentlayer
- Less Boilerplate: I no longer had to write custom fetch logic for each content type. Contentlayer automates the process, giving me more time to focus on building features.
- Type Safety: With automatically generated types, I didn’t need to manually define TypeScript interfaces for my content. Contentlayer handled this for me, ensuring that my content stayed consistent across the app.
- Cleaner Code: By using Contentlayer, I was able to remove a lot of manual setup and focus on keeping the codebase clean and simple.
5. Final Thoughts
The transition from next-mdx-remote to Contentlayer was less about overcoming limitations and more about optimizing for simplicity and clean code. I initially set up custom repositories to handle content fetching from GitHub, but as my future plans for the portfolio changed, I realized I didn’t need the extra complexity of external repositories.
My focus shifted toward streamlining the setup, and Contentlayer provided the automation, type safety, and minimal configuration that aligned perfectly with my long-term goal of reducing complexity while maintaining flexibility. This shift allowed me to create a more maintainable and efficient portfolio without compromising on future scalability.
Thank you for taking the time to learn about the project.